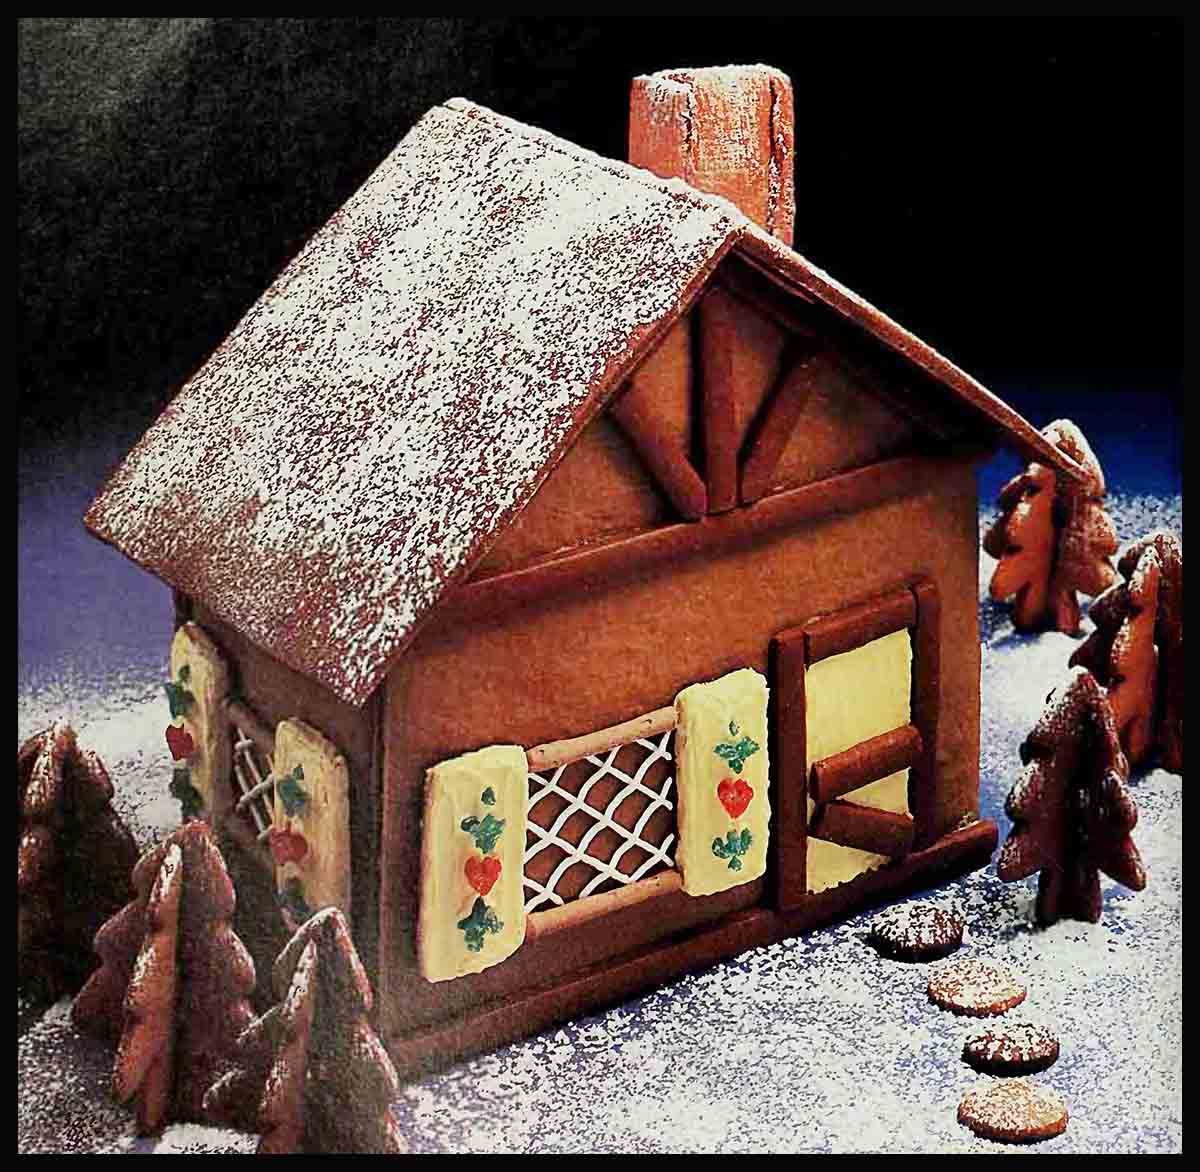
Cookie Chalet
Equipment
Grid paper for enlarging patterns
Heavy paper for patterns
1 or 2 cookie sheets (15½ X 12 inches)
Stockinet-covered rolling pin
Small sharp knife and scissors
Waxed paper
Small spatula
Decorators’ tube or envelope cone
#3 and #10 tips for decorators’ tube
Tray (base for chalet)
Preparation
1. Prepare Merry Christmas Molasses Cookie dough as directed except—use light molasses, omit cinnamon and decrease baking soda to 1 teaspoon. Refrigerate at least 1 hour. Enlarge patterns according to scale and cut from heavy paper.
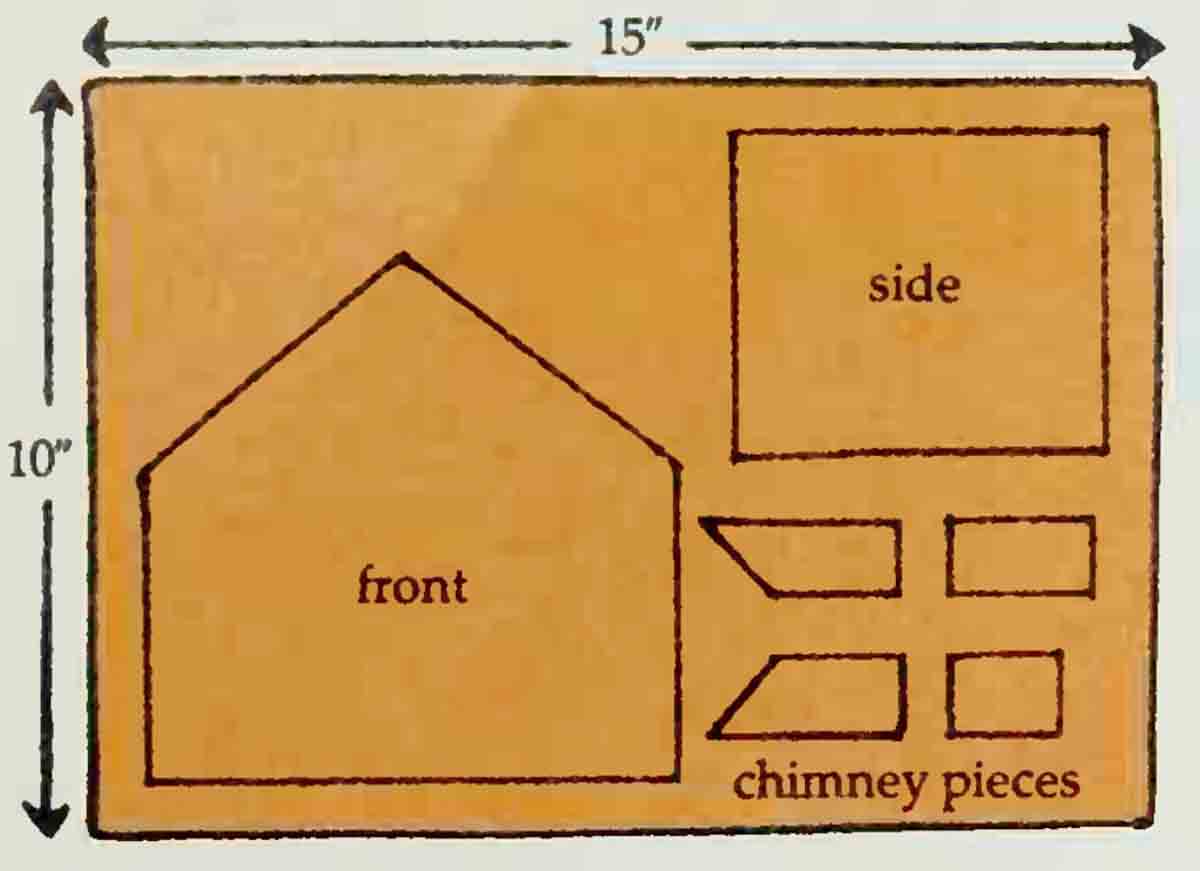
2. Roll 2 cups dough into rectangle, 15 X 10 inches, on lightly greased cookie sheet with floured stockinet-covered rolling pin. (If cookie sheet slips while rolling, place dampened towel underneath.) Heat oven to 375°. Place patterns on rectangle as shown in Diagram A. (The dough will expand during baking, so be sure to place the patterns at least ½ inch apart.) Cut around patterns with sharp knife; remove and reserve excess dough. Make slight marks with knife to indicate position of doors and windows. Bake until no indentation remains when touched, 5 to 6 minutes for small pieces, about 10 minutes for large pieces. Cool large pieces 1 to 2 minutes; remove to wire rack.
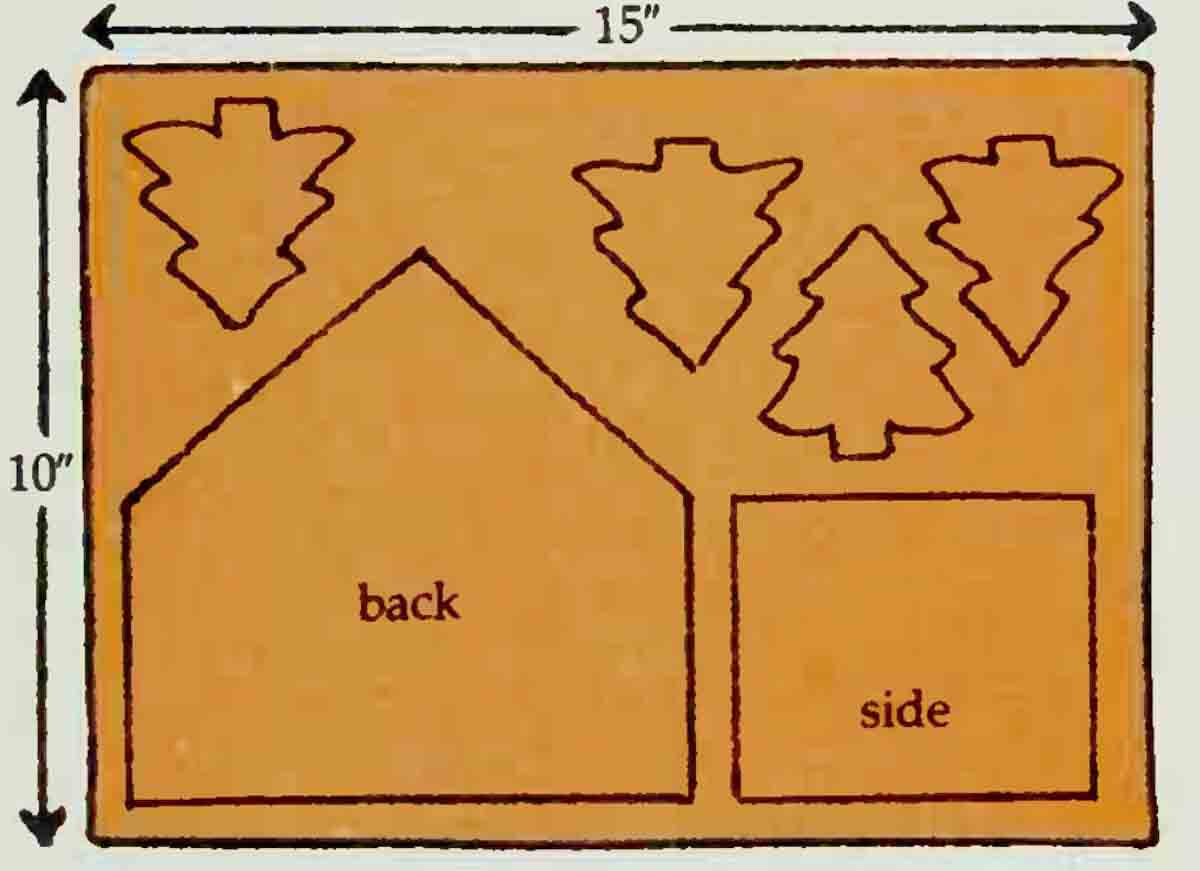
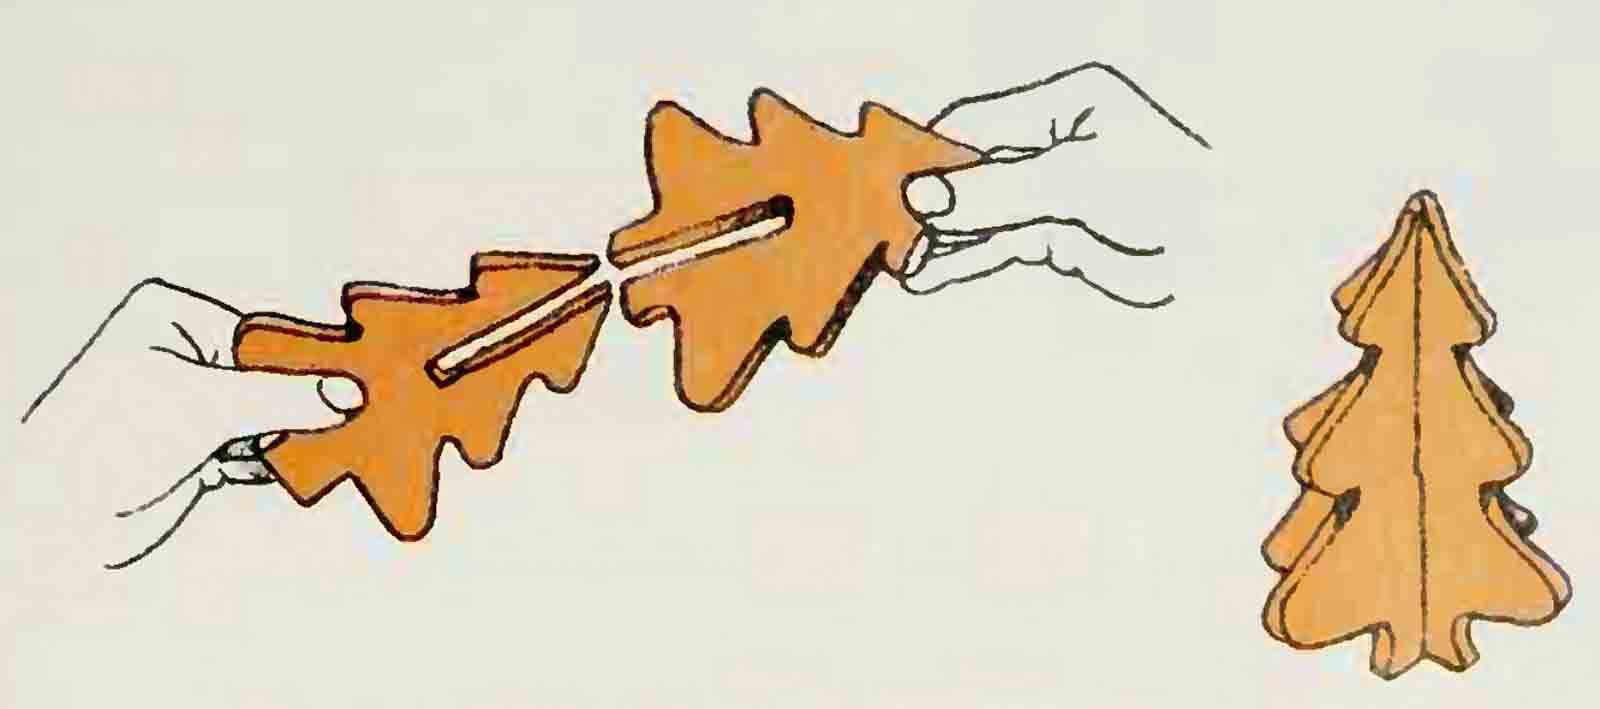
3. Repeat Step 2 except place patterns on rectangle as shown in Diagram B. Before baking, cut 3/8-inch-wide slot 1½ inches down from top of half of the trees; cut 3/8-inch-wide slot 1¾ inches up from bottom of remaining trees. After baking, while cookie trees are warm, insert bottom slot of one tree into top slot of another; repeat.
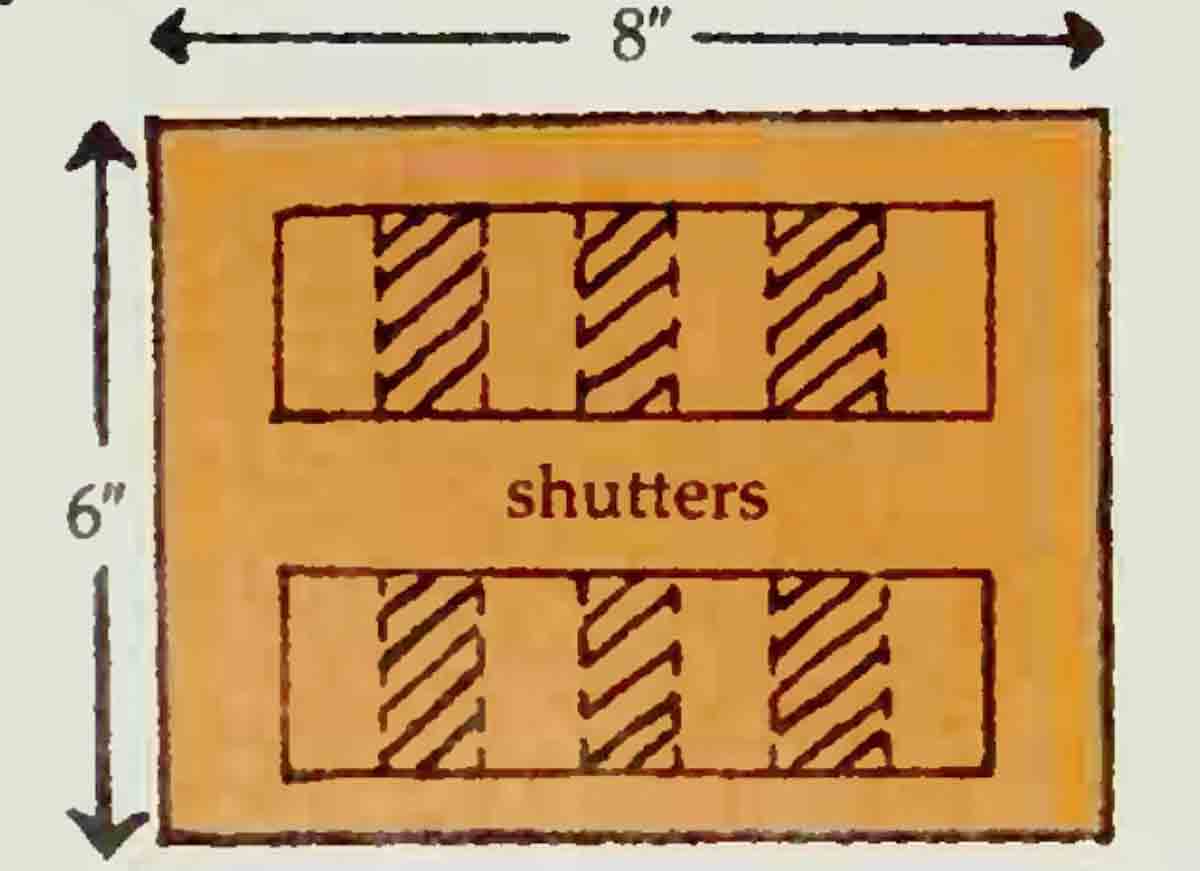
4. Roll about ½ cup dough 1/16 inch thick into rectangle, about 8 X 6 inches, on lightly greased cookie sheet. Cut into 2 rectangles, each 7 X 2¼ inches, for the shutters as shown in Diagram C; reserve excess dough. Cut each rectangle into seven 1-inch strips. Remove every other strip, leaving 8 shutters. Bake shutters 5 to 6 minutes.
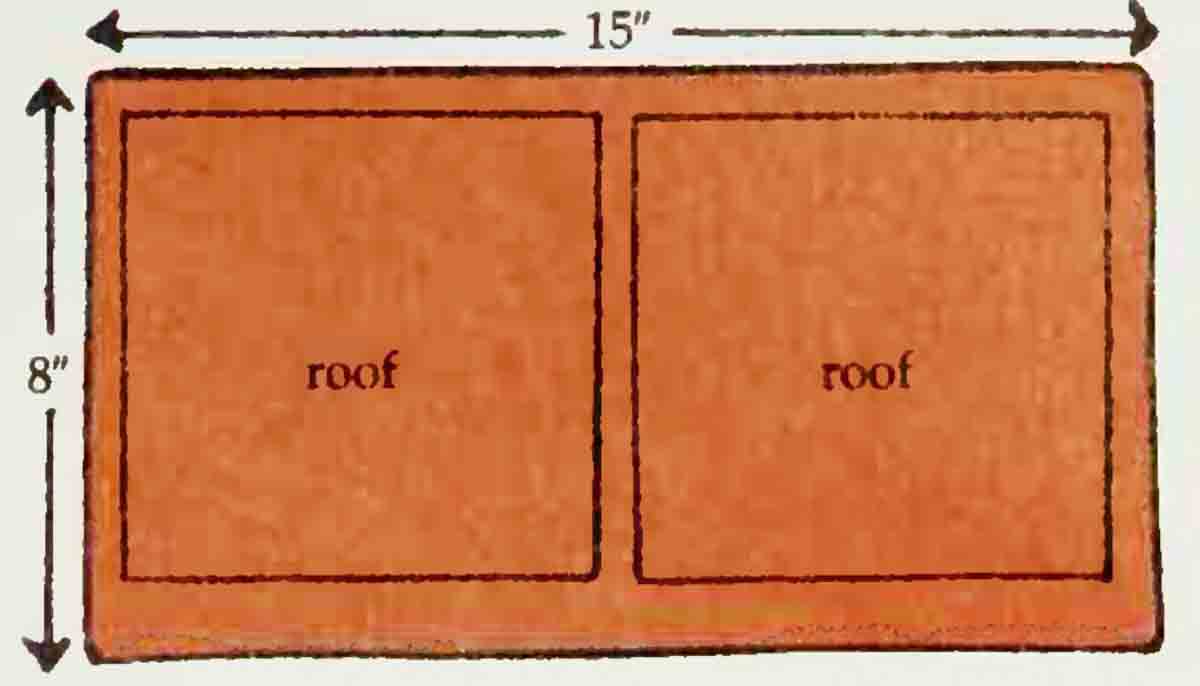
5. Press remaining dough and the reserved dough into a ball (about 2 cups); knead in 1/3 cup cocoa. Roll 1½ cups cocoa dough into rectangle, 15 X 8 inches, on lightly greased cookie sheet. Cut 2 roof pieces as shown in Diagram D. Remove and reserve excess dough. Bake roof pieces about 10 minutes. Cool 1 to 2 minutes.
6. Roll all remaining dough Yıs inch thick into square, about 9 X 9 inches, on lightly greased cookie sheet. Cut into 20 strips, each 9 X 3/8 inch, for trim. Remove every other strip, leaving 10 trim strips on cookie sheet. Bake trim strips 6 to 8 minutes.
7. Roll remaining dough about 1/8 inch thick; cut to form stones for path. Cut additional trees if desired. Bake 5 to 6 minutes.
Trimming and Construction
1. Flatten 8 small red gumdrops and 8 small green gumdrops with rolling pin between 2 sheets of waxed paper. Cut 16 heart designs from red gumdrops with sharp knife or scissors. (Dip knife or scissors into hot water for easier cutting.) Cut accent designs from green gumdrops.
2. Prepare 1 package (7.2 ounces) fluffy white frosting mix as directed on package. Stir in 3 cups powdered sugar, ½ cup at a time, until thick and smooth. Keep covered.
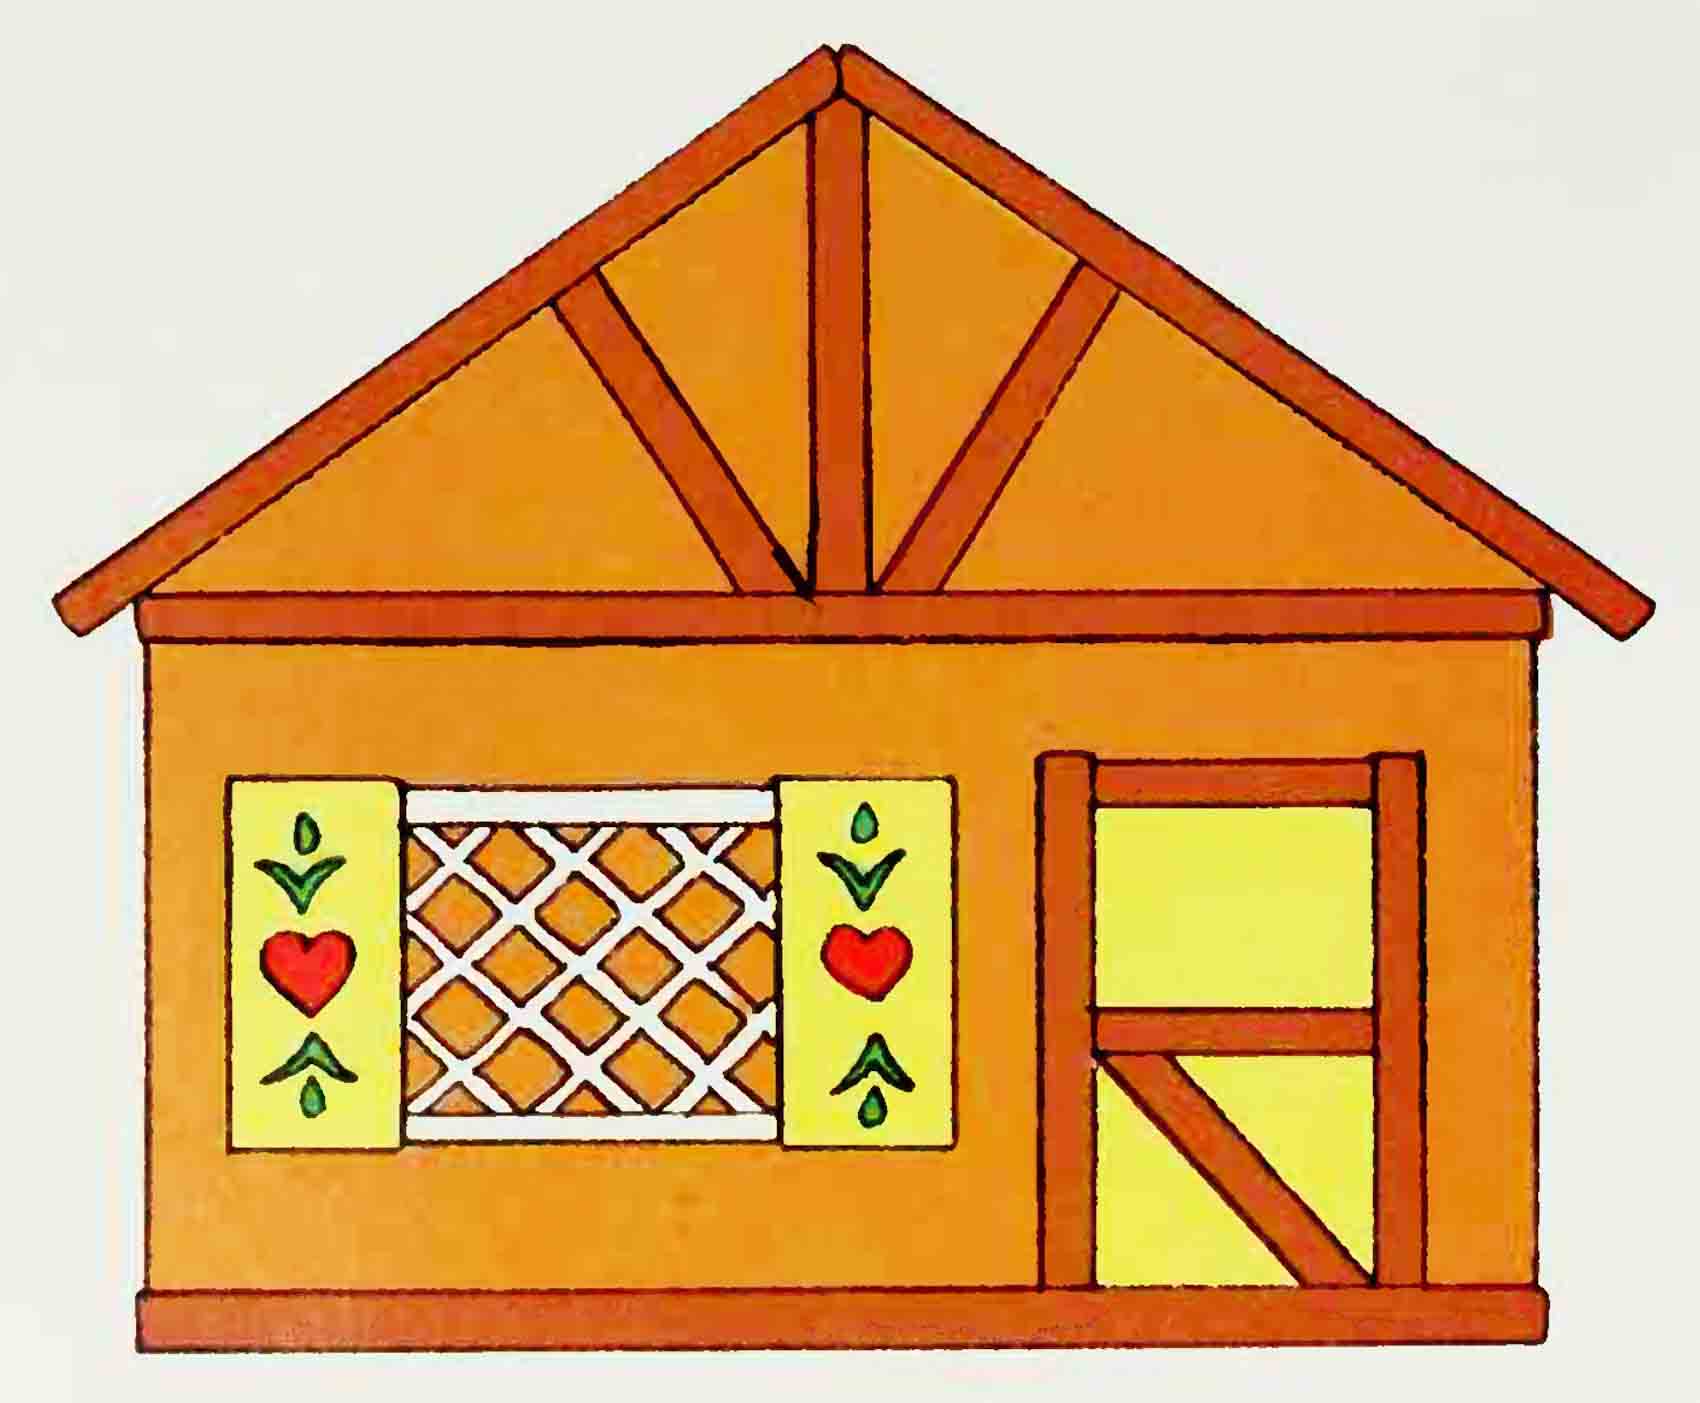
3. Tint about ½ cup frosting with yellow food color. Frost door area and shutters using small spatula. Press gumdrop appliqués into position on shutters.
4 Place about 1/3 cup frosting in decorators’ tube with #3 tip or use an envelope cone. Pipe lattice design for window panes on sides of house. Spread a strip of frosting on back of each shutter; press into position around panes.
5. Mix remaining frosting and ¼ cup cocoa. Keep covered. If frosting becomes too thick, stir in a few drops of water. Attach 9-inch strips to top and bottom of front and back of house, using cocoa frosting for “cement.” Cut strips to fit along bottom of each side of house and below eaves if desired; attach with cocoa frosting. Cut strips for attic trim at a slant with sharp knife; cut strips for door trim. Attach with cocoa frosting.
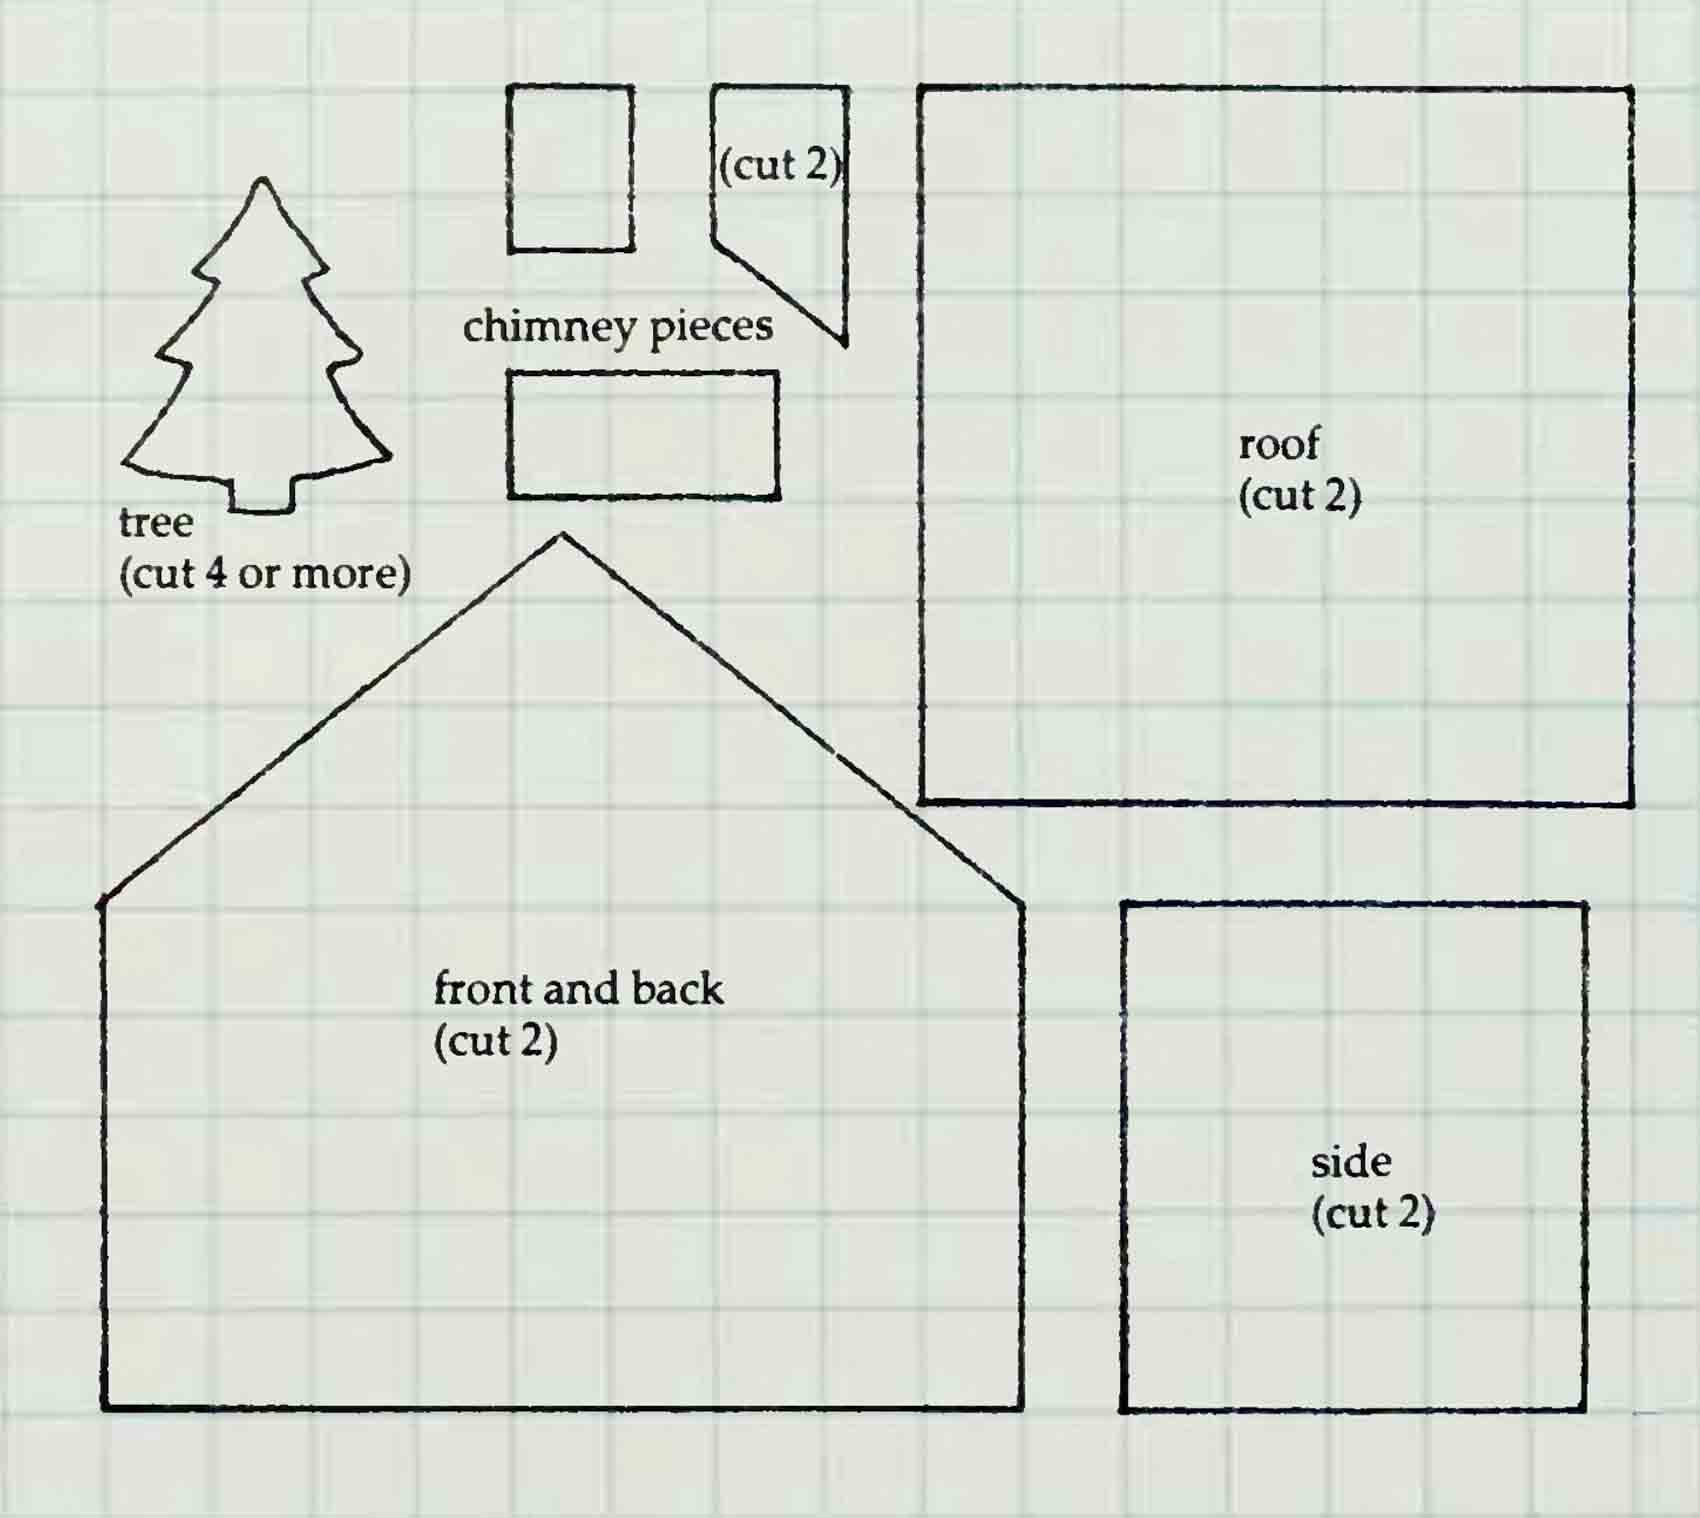
Each square equals 1 inch.
A 3-inch tree-shaped cookie cutter can be used instead of pattern.
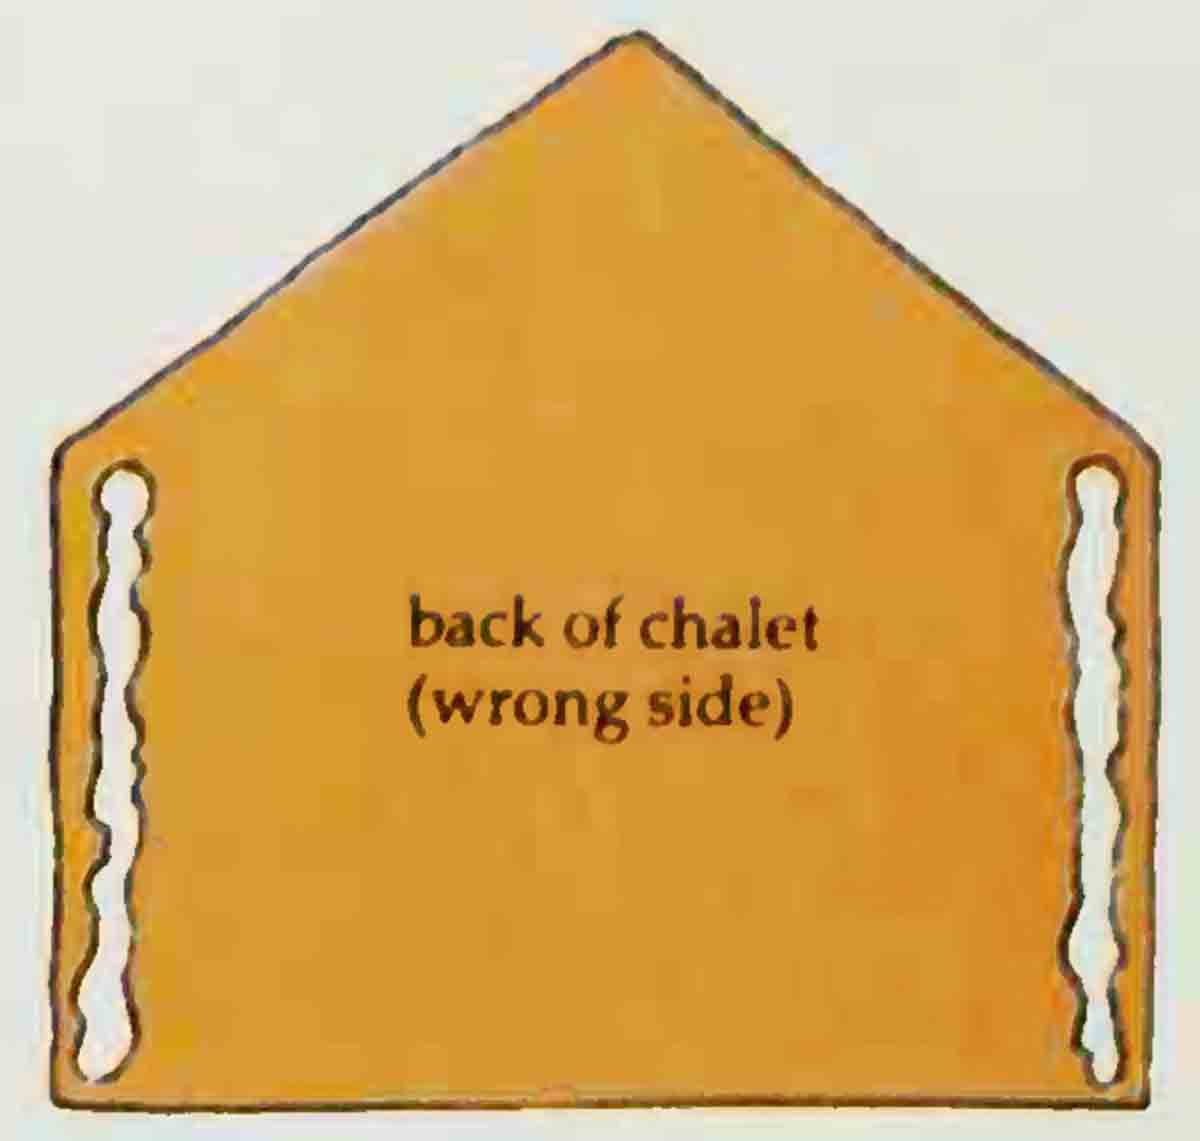
6. Place remaining cocoa frosting in decorators’ tube with #10 tip. Pipe strip above and below window lattice. Pipe ½-inch strip of frosting on inside vertical edges of back of house. Using a tray for the base, place back of house in vertical position on tray; press side pieces of house into frosting, making sure corners are square. Pipe cocoa frosting on inside vertical edges of front of house; press to front sides of house. Pipe frosting along inside vertical seam lines for reinforcement. Let set about 30 minutes. (Objects such as cans or bottles can be used to hold in place until frosting sets.)
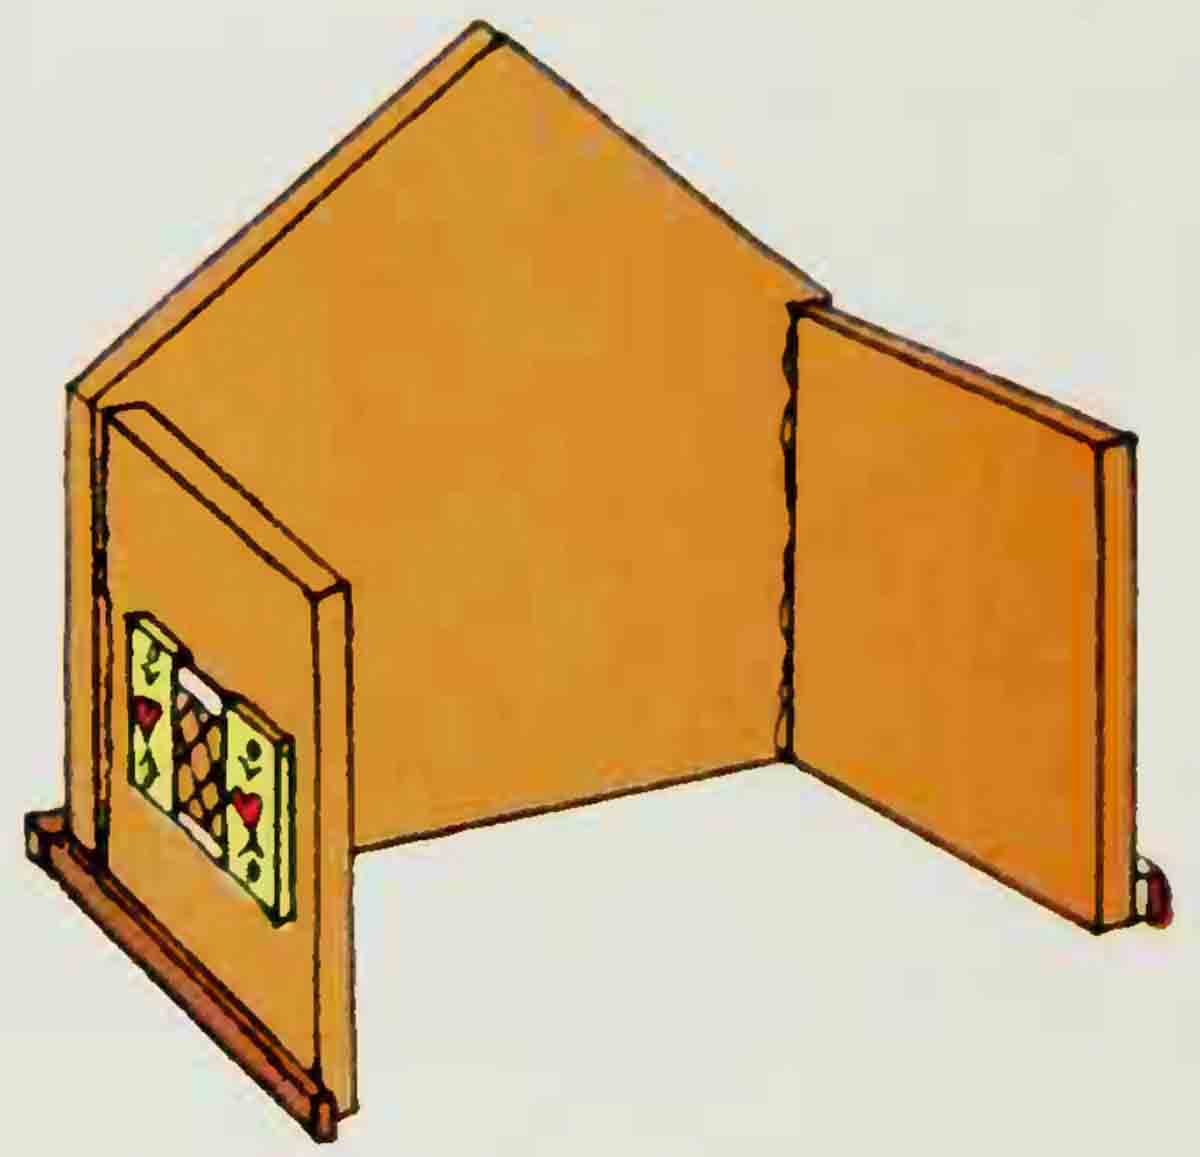
When pressing side pieces to frosting, make sure corners are square.
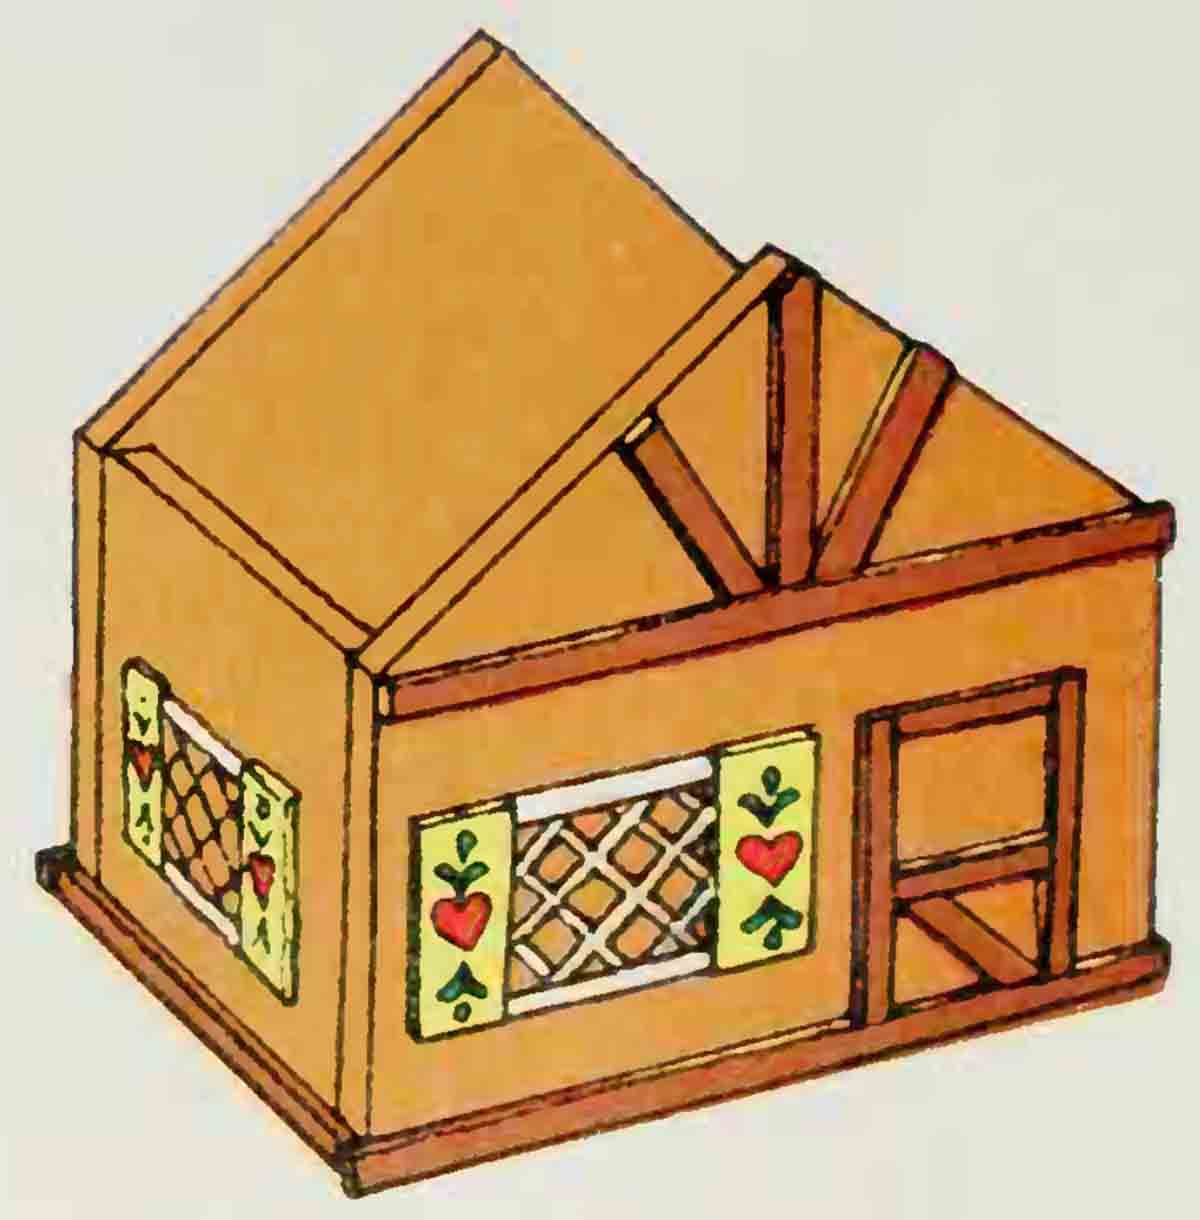
7. Pipe frosting generously along top edges of front and back of house. Place roof pieces on top, making sure peaks meet in center.
8. Pipe frosting on inside vertical edges of 2 slanted chimney pieces. Press side pieces of chimney into frosting to form “box.” Hold a few minutes until set; let dry. Pipe frosting on bottom edges of chimney; place on roof. Pipe any remaining frosting into seams as needed for reinforcement.
9. Arrange trees and path around house as desired. Sprinkle trees, path, house and tray lightly with powdered sugar.
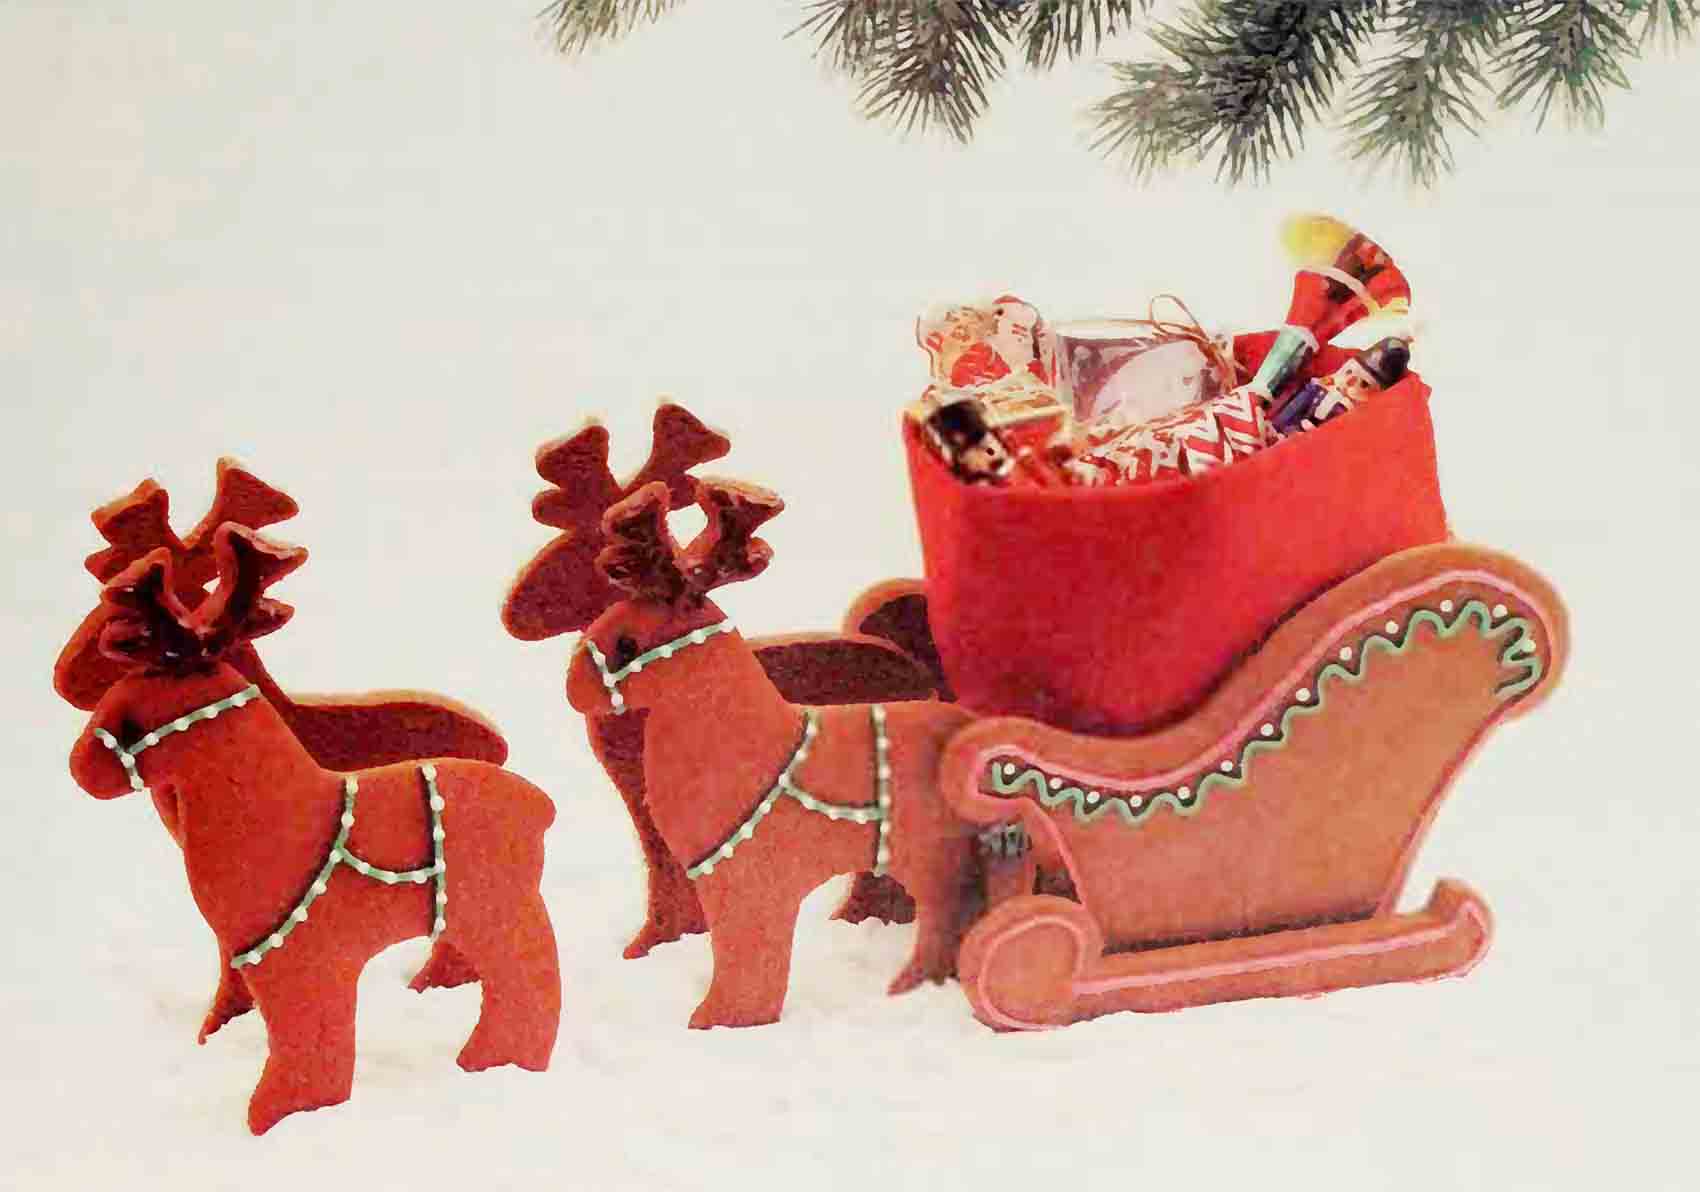
Christmas Sleigh and Reindeer
Preparation
1. Prepare Merry Christmas Molasses Cookie dough as directed. Refrigerate at least 1 hour. Enlarge patterns according to scale (see Pattern Plan) and cut from heavy paper.
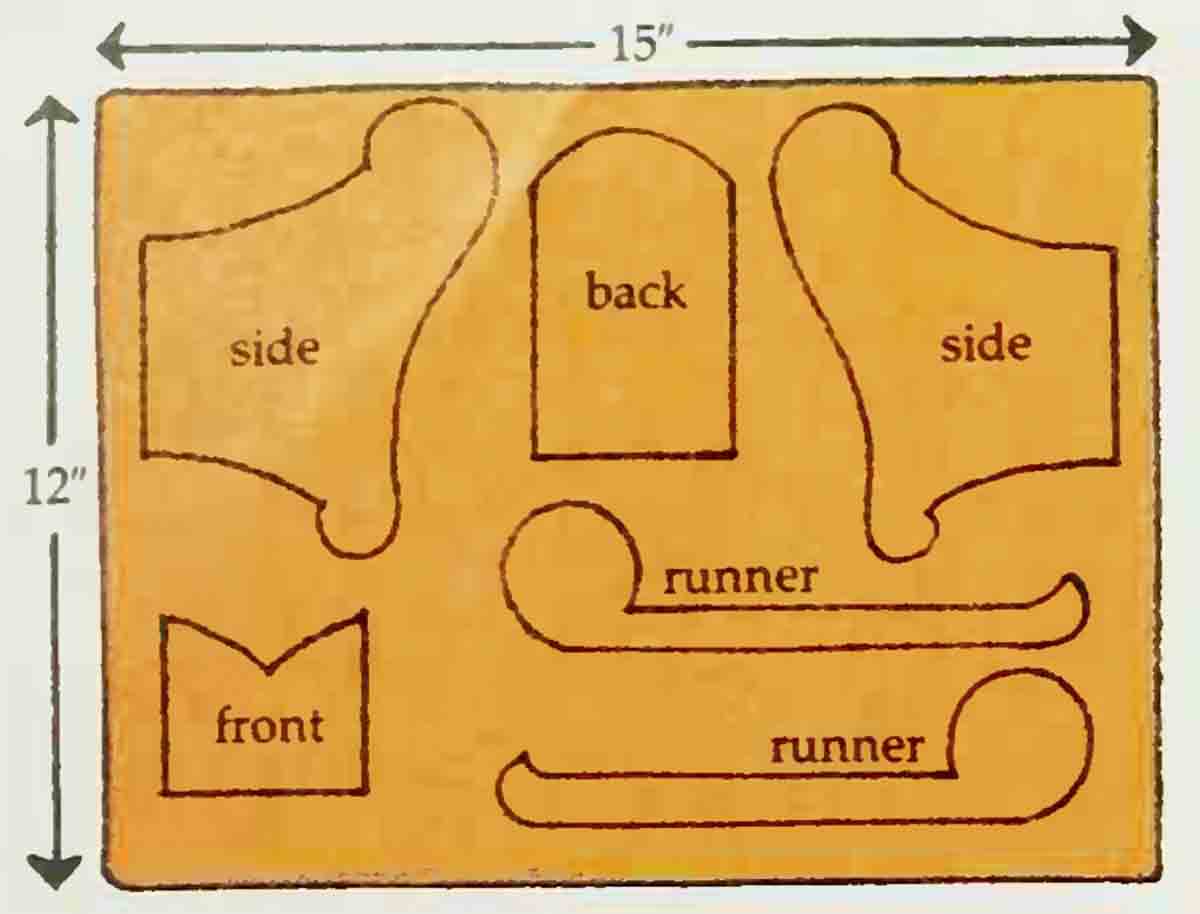
2. Divide dough into halves. Roll 1 half into rectangle, 15 X 12 inches, on lightly greased cookie sheet with floured stockinet-covered rolling pin. Heat oven to 375°. Place sleigh patterns on rectangle as shown in Diagram A. (The dough will expand during baking, so be sure to place the patterns at least ½ inch apart.) Cut around patterns with sharp knife; remove and reserve excess dough. Bake until no indentation remains when touched, 7 to 8 minutes. Cool 1 to 2 minutes; remove to wire rack.
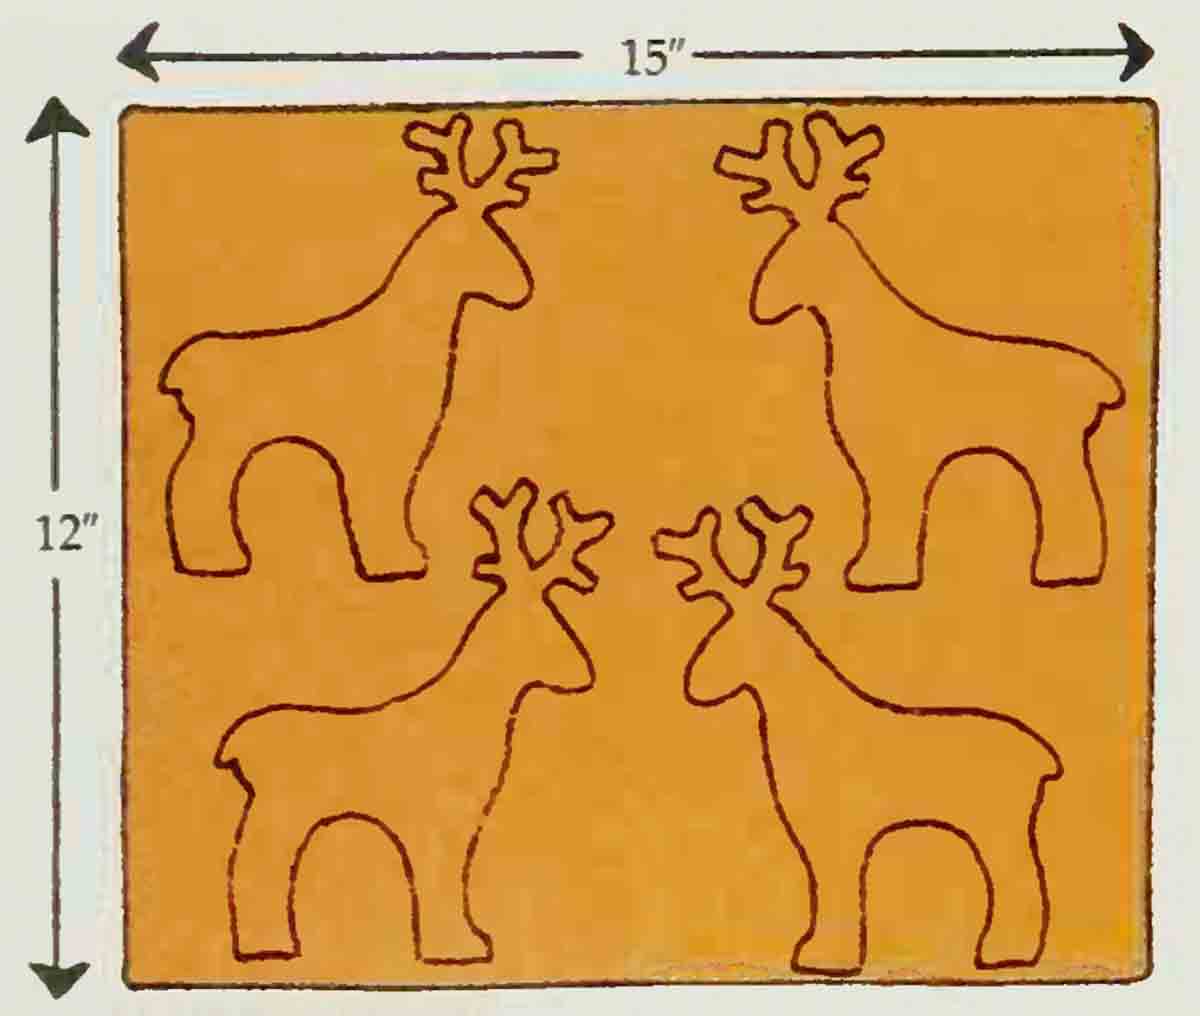
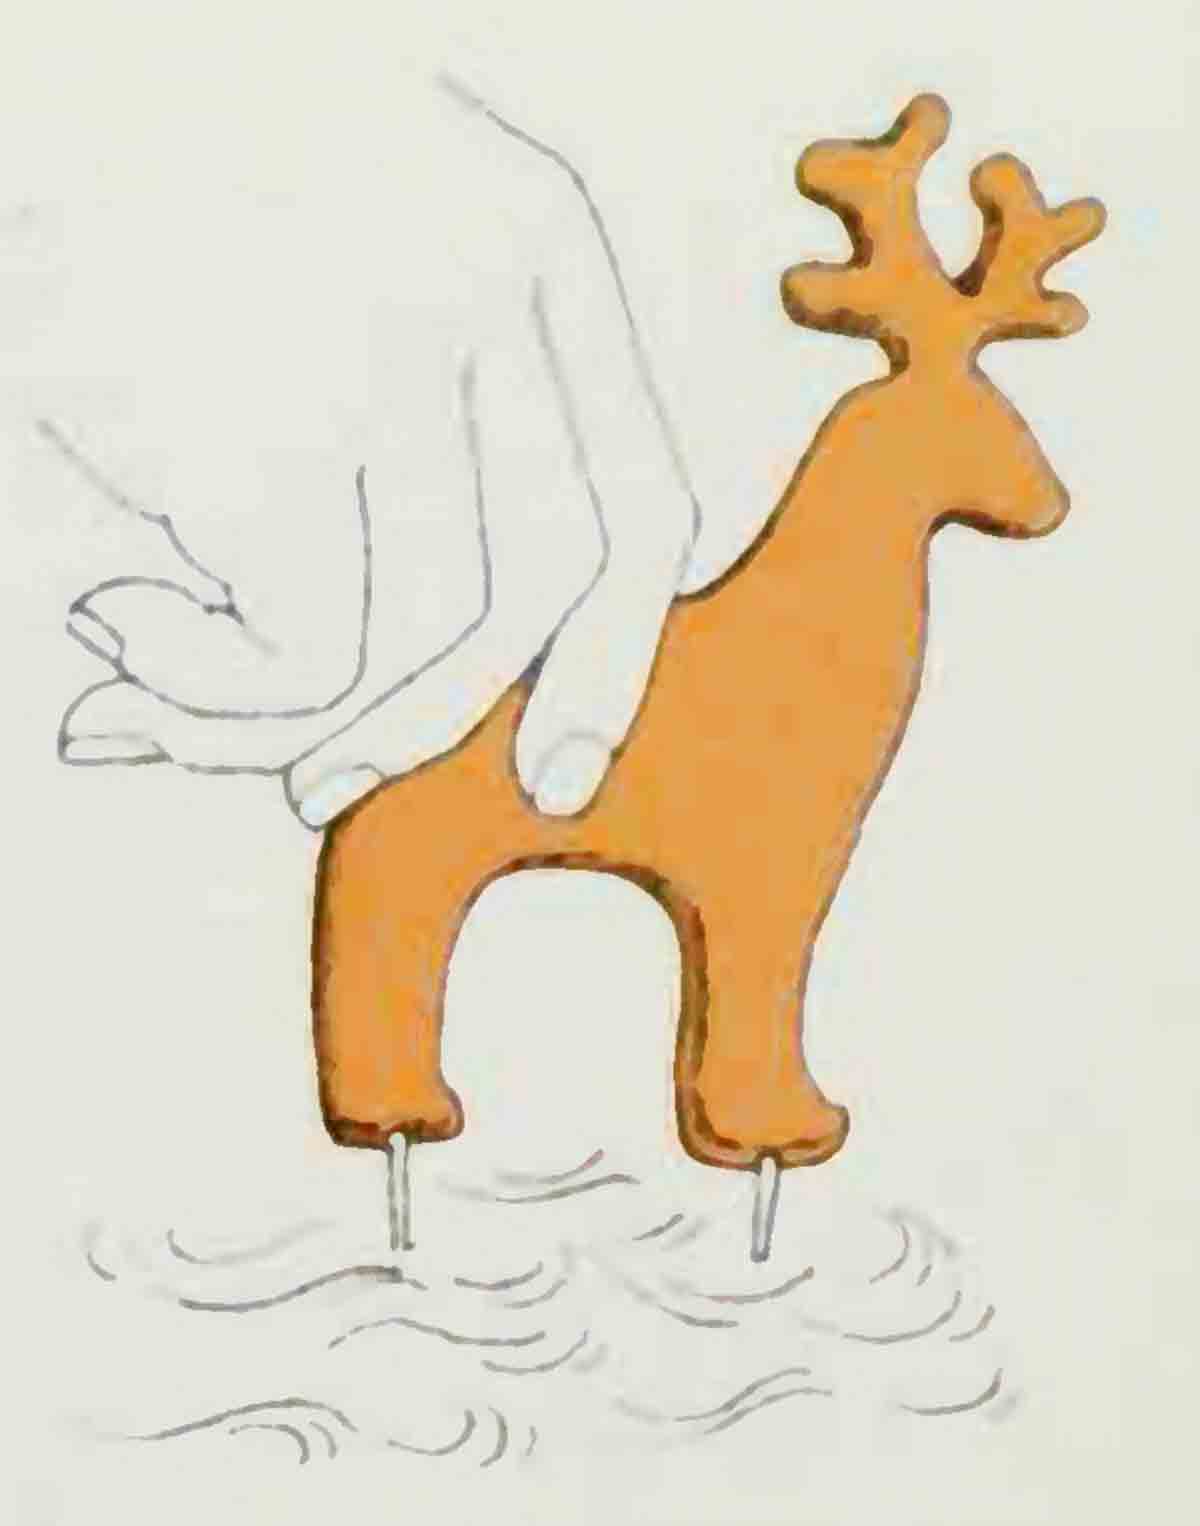
3. Repeat Step 2 except place reindeer patterns on rectangle as shown in Diagram B. After removing excess dough, carefully insert part of wooden pick into each leg, leaving about ½ inch of pick exposed. (The picks will help support the reindeer.) Bake as directed.
4 Press remaining dough and the reserved dough into a ball. Roll into rectangle, 15 X 9 inches, on lightly greased cookie sheet. Trim evenly into rectangle, 14 X 8 inches. (This forms the base for the sleigh and reindeer.) Bake until no indentation remains when touched, 8 to 9 minutes. Cool 1 to 2 minutes; remove to wire rack.
Trimming and Construction
1. Prepare 1 package (7.2 ounces) fluffy white frosting mix as directed on package. Stir in 3 cups powdered sugar, ½ cup at a time, until thick and smooth. Measure and reserve 1 cup frosting; keep covered. Spread remaining frosting on baked rectangle base. (If a fluffier look is desired, prepare another package of frosting mix as directed above and spread on frosted base.)
2. Divide reserved frosting into 3 parts. Tint 1 part with green and 1 part with red food color. (Paste food color will make more vivid colors.)
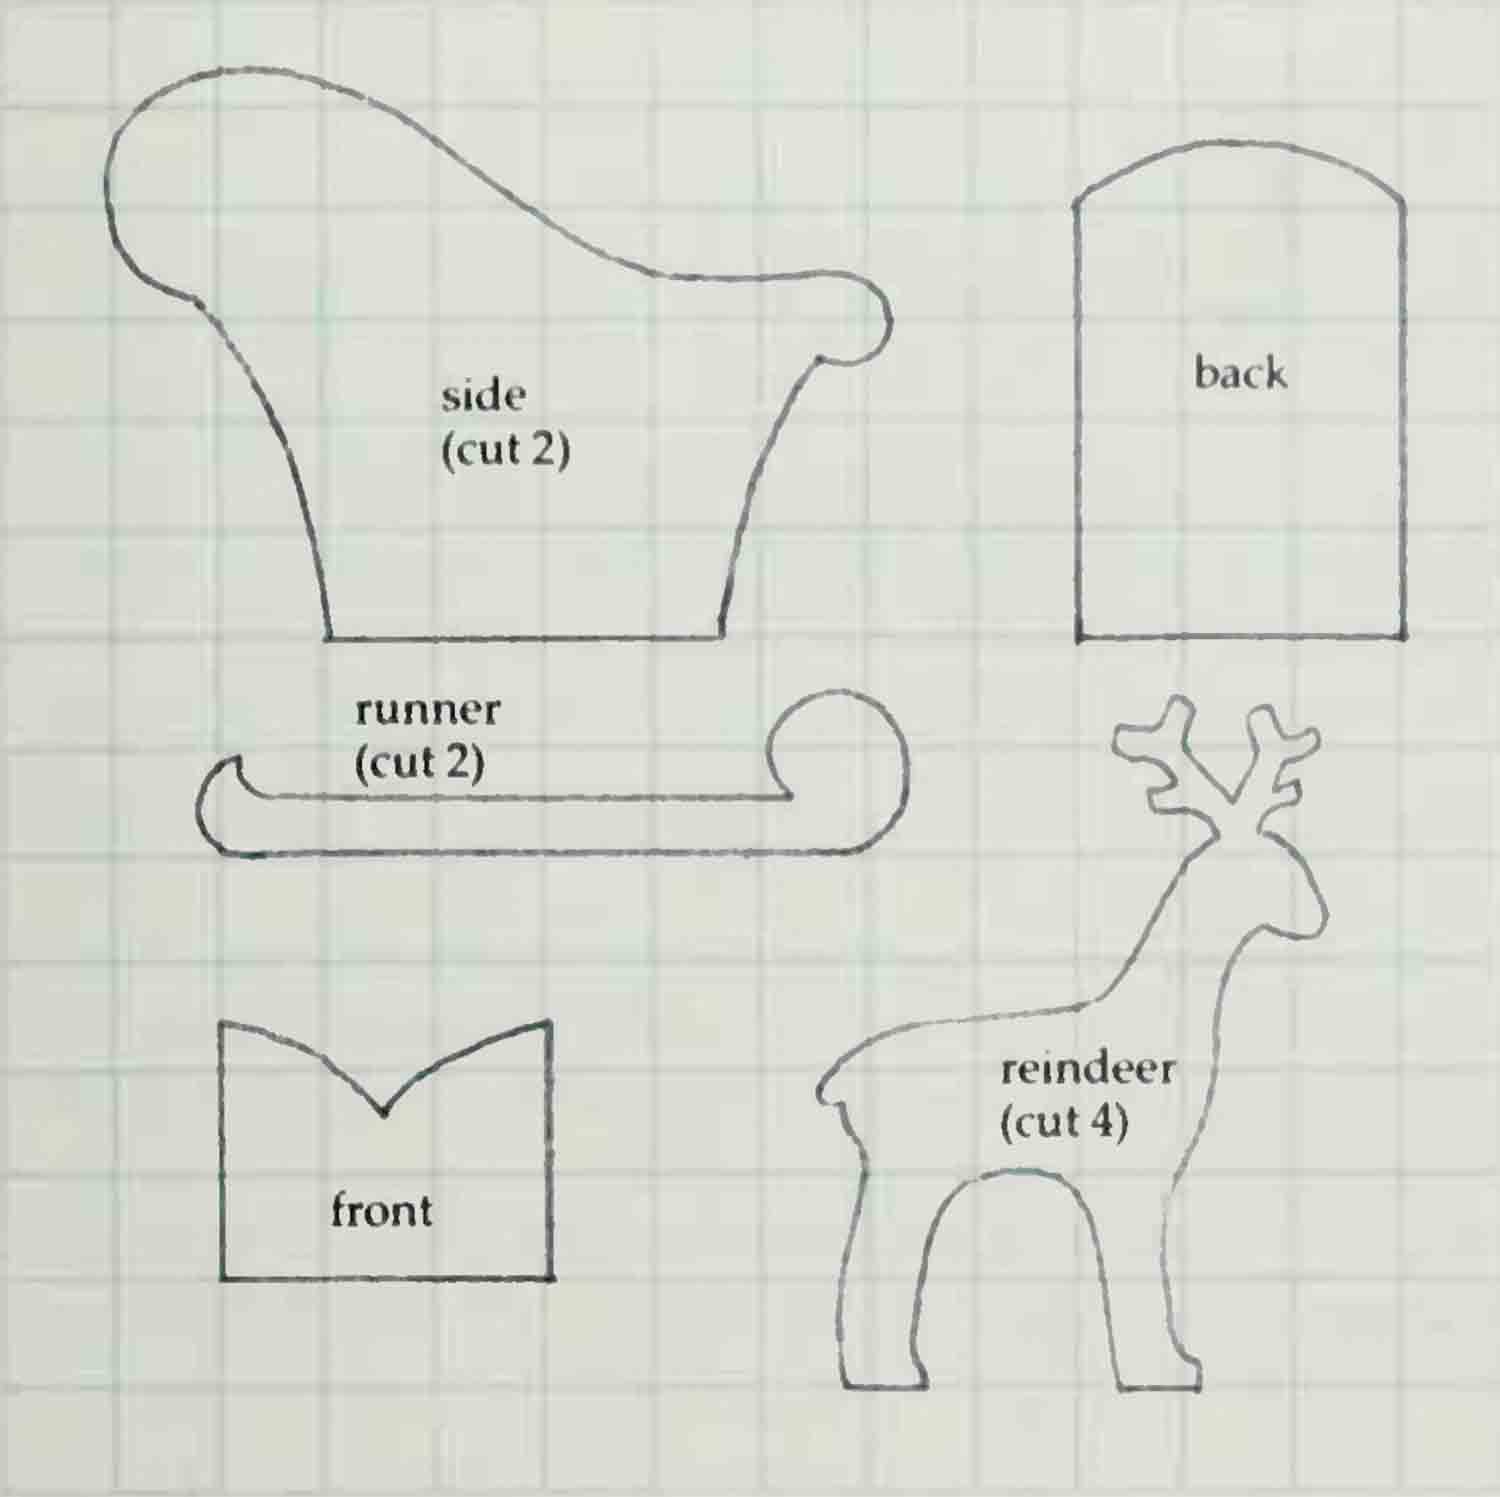
Each square equals 1 inch.
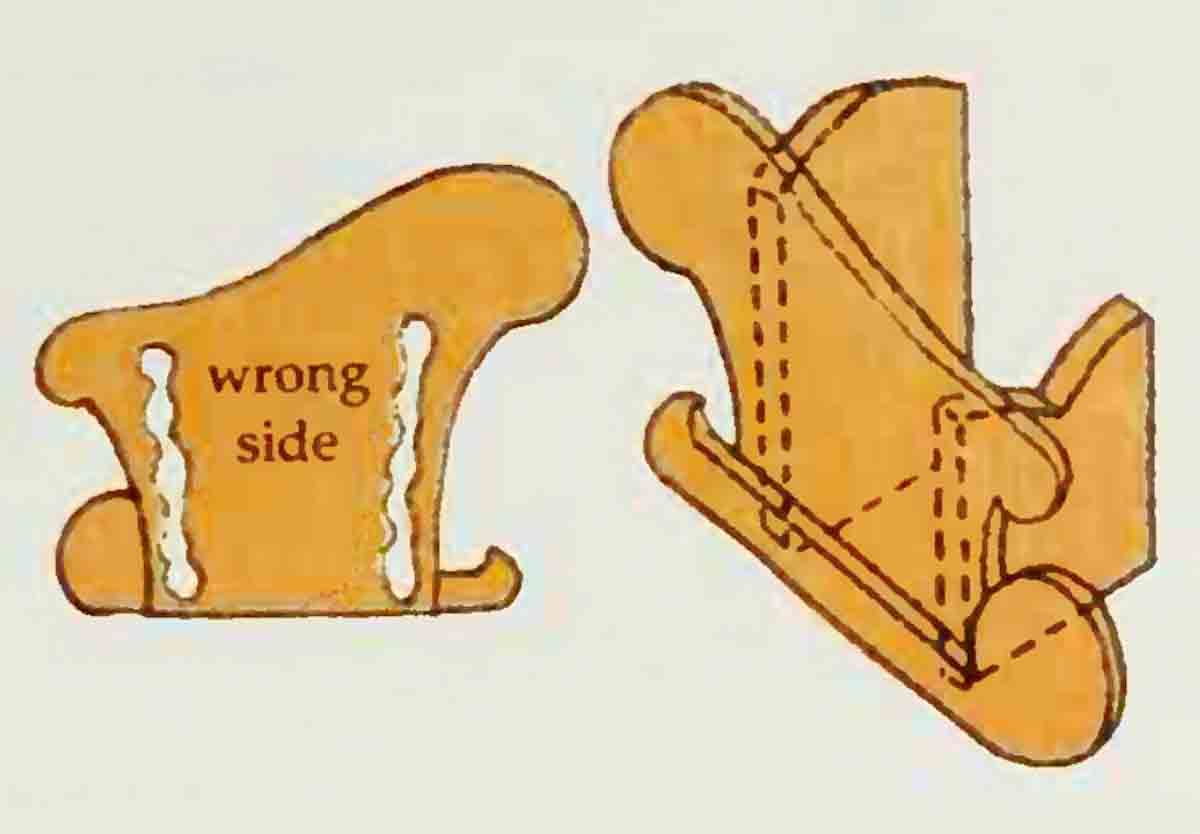
3. Attach runners to sleigh with small amount of red frosting as shown in Diagram C. Place remaining red frosting in decorators’ tube with #3 tip or use envelope cone; decorate sides of sleigh and reindeer as desired. Repeat with green and white frostings. Frost antlers with melted chocolate.
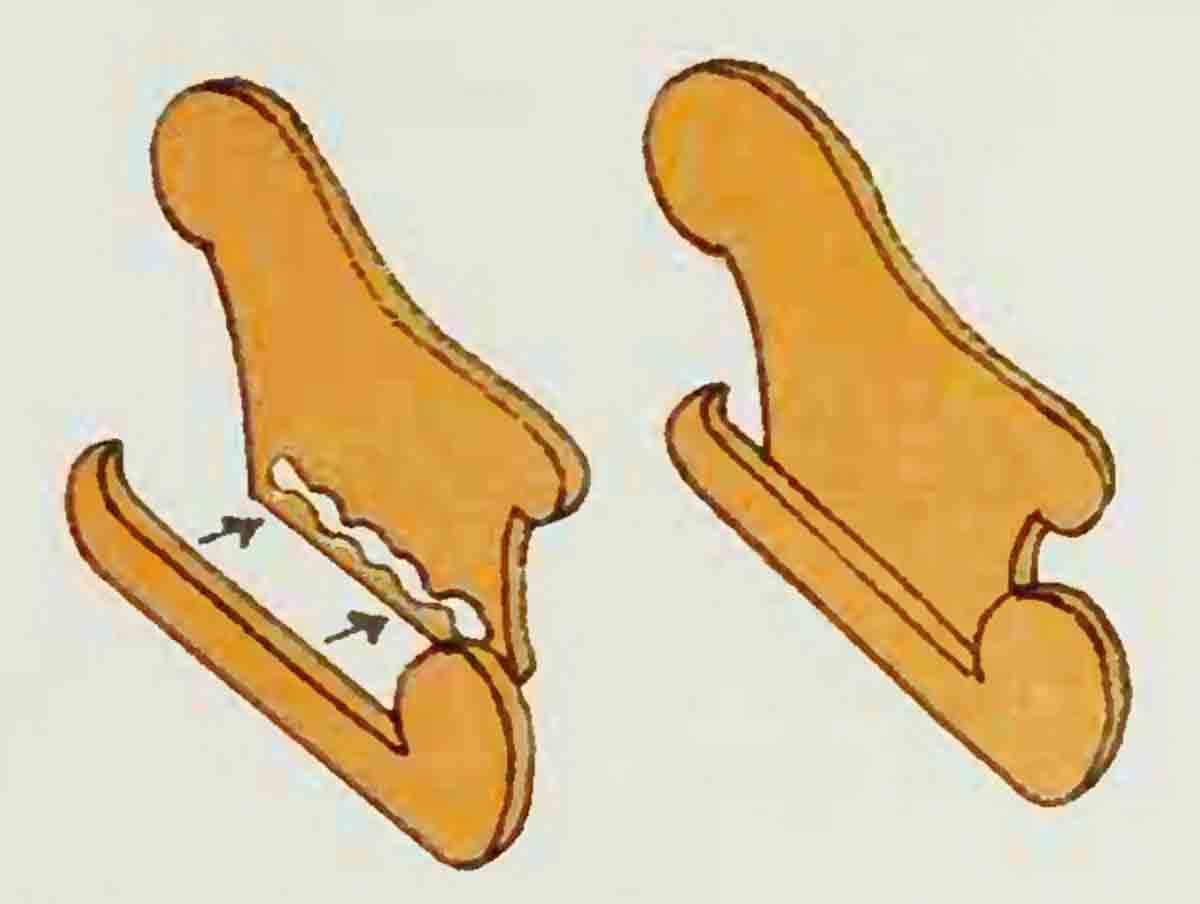
4. Pipe generous amount of remaining frosting on inside vertical edges of sleigh sides as shown in Diagram D. Holding one side of sleigh upright at one end of frosted base, press back of sleigh into frosting to join, then press front of sleigh into frosting. Press other side of sleigh against front and back pieces. Hold until secure. Pipe any remaining frosting along inside seams as needed for reinforcement. Place reindeer in front of sleigh, lightly pressing exposed portions of wooden picks into frosted base. Fill sleigh with pine sprigs, small toy Santa, cookies or small packages.
It is a quote. Betty Crocker’s New Christmas Cookbook 1993


